How to Run Maestro Tests in GitLab CI (Android)
Automating mobile UI tests in GitLab CI with Maestro can streamline your testing process, allowing for consistent and repeatable tests on every code push. This guide will help you configure GitLab CI to run Maestro tests using the specified YAML configuration.

Prerequisites
- Maestro API Key: Ensure you have a valid Maestro API Key for cloud testing. This key will be used to authenticate your requests on the Maestro platform.
- Maestro-Compatible Docker Image: Use a Docker image with Maestro CLI version 1.39.1, such as
pradapjackie/maestro:1.39.1, as specified in the.gitlab-ci.ymlfile. - Android Test Artifacts: Prepare the APK (
app-release.apk) and the Maestro configuration file (android.yaml) for testing. These should be stored in the.maestrodirectory at the root of your project.
I have created a docker image and pushed it to Docker hub and it can be used to run the maestro test.
https://hub.docker.com/r/pradapjackie/maestro
GitLab CI Configuration File
Below is the .gitlab-ci.yml file to run Maestro tests in the GitLab CI environment.
stages:
  - test

run-maestro-cloud-test:
  stage: test
  image: pradapjackie/maestro:1.39.1

  script:
    - maestro cloud --apiKey $MAESTRO_API_KEY .maestro/app-release.apk .maestro/android.yaml

  after_script:
    - echo "Check the results in the Maestro Console."
Explanation of the YAML File
- Stages: Defines the stages of the pipeline, with a single stage called
testfor running Maestro tests. - Job
run-maestro-cloud-test: - Stage: Runs within the
teststage of the pipeline. - Image: Uses the Docker image
pradapjackie/maestro:1.39.1, which contains Maestro CLI version 1.39.1. - Script: The commands to execute during the job.
maestro cloud --apiKey $MAESTRO_API_KEY .maestro/app-release.apk .maestro/android.yaml: Runs the Maestro test on the cloud using your provided API key. Ensure your GitLab CI/CD environment variables include$MAESTRO_API_KEYto securely pass the key.- After Script: Displays a message upon job completion to direct the user to the Maestro Console for viewing results.
Setting Up Environment Variables
To securely store your API key, add it to your GitLab CI/CD environment variables:
- In your GitLab project, navigate to Settings > CI/CD.
- Expand the Variables section.
- Click Add Variable.
- Set the Key as
MAESTRO_API_KEYand paste your API key into the Value field. - Ensure Protect and Mask options are selected for security, then click Add Variable.
Running the Pipeline
With your .gitlab-ci.yml file configured, commit the changes to trigger the pipeline. The pipeline will execute the run-maestro-cloud-test job, running the Maestro tests in the cloud using the specified APK and YAML files.


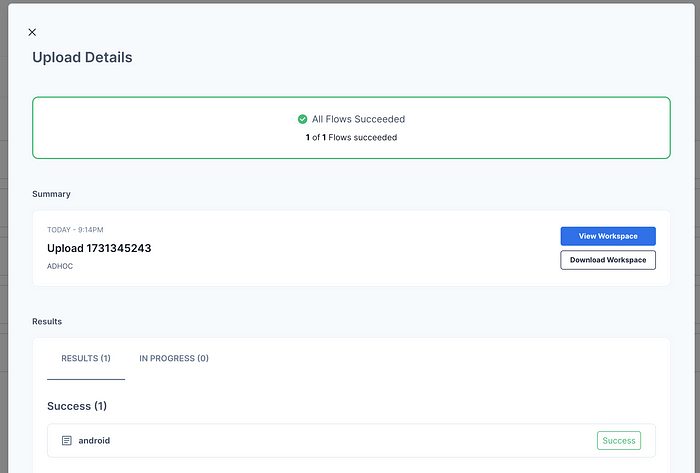
Viewing Test Results
After the pipeline completes, log into the Maestro Console to review test results. The after_script command outputs a reminder to check the results in the console.

Conclusion
This GitLab CI setup automates your Maestro test execution, allowing for faster and more reliable mobile UI testing. With this configuration, you can ensure every commit is tested consistently, catching potential issues before they reach production.
I have created a project on Gitlab and added the code here.
Feel free to hit clap if you like the content. Happy Automation Testing :) Cheers. 👏